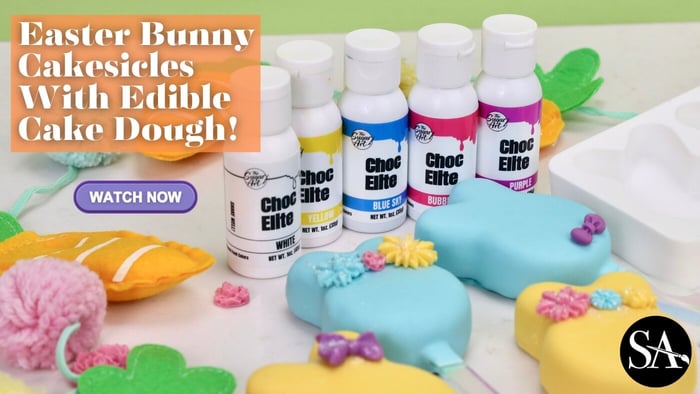
Springtime Wonderland: Crafting Easter Bunny Cakesicles with Edible Cake Dough
As Easter approaches, it's time to infuse your celebrations with a touch of whimsy and a dash of creativity. Imagine indulging in adorable Easter Bunny Cakesicles—delicious treats that not only captivate the eyes but also delight the taste buds. In this delightful journey, we'll dive into the art of making these charming cakesicles, complete with a recipe for edible cake dough and essential tips on tempering chocolate. So, don your apron, unleash your inner pastry artist, and let's whisk our way into a wonderland of sweet Easter delights.
Part I: The Bunny Ballet—Making Easter Bunny Cakesicles
Edible Cake Dough
All you need is fully baked cake mixed with a little bit of buttercream icing. You can see our edible cake dough hack in the video above! Using store-bought cupcakes is a quick and easy way to make sure your edible cake dough comes out perfect.
For the Cakesicles You Will Need:
Edible cake dough (video above)
Acrylic candy sticks - Shop Here
White chocolate, melted and tempered
Pastel-colored white chocolate for decorating - Choc Elite Collection (click here)
Sprinkles, edible pearls, or colored chocolate pieces for embellishment - shop small molds here
24 Iridescent Popsicle Sticks

$10.00
A BUNDLE OF 24 POPSICLE STICKS AT AN UNBEATABLE PRICE! USE THESE POPSICLE STICKS FOR YOUR CAKES, COOKIES AND CHOCOLATE TREATS! THEY ARE MOST COMMONLY USED FOR CAKESICLES. THIS SET INCLUDES IRIDESCENT STICKS. THEY ARE CLEAR, REFLECTING MANY DIFFERENT COLORS. **… read more
Small Daisy Mold
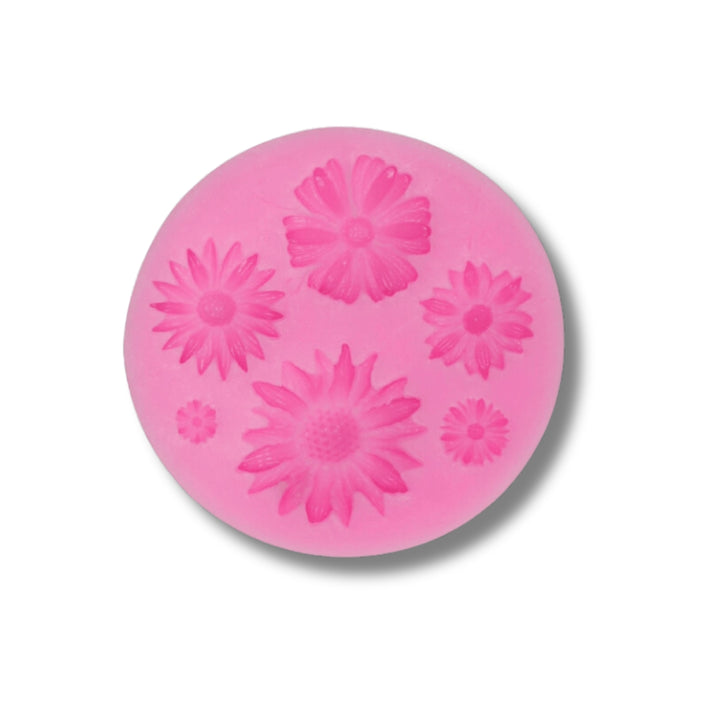
$5.00
THIS 7-CAVITY FLOWER FONDANT MOLD IS A MUST HAVE! PERFECT FOR MAKING SMALL FLOWER PIECES OUT OF FONDANT, MODELING CHOCOLATE OR CHOCOLATE! USE THESE ROSES ON COOKIES, CAKES, CUPCAKES - ANY CONFECTION! LOVE THIS DESIGN FOR EASTER COOKIES, SPRING CAKES, MOTHER'S DAY… read more
Instructions:
Making the Edible Cake Dough:
Whisking Wonderland Begins: In a mixing bowl, whisk together the fully baked cake with small dollops of buttercream icing until you achieve the optimal consistency.
Insert Dough into Mold: Roll the edible cake dough around into a large ball (see video above) and insert it until the bunny mold is completely filled and level.
Chill and Settle: Place the mold in the refrigerator to chill for at least 1 hour. This step allows the dough to harden just enough so we can dip them into our warm, tempered chocolate.
Crafting Easter Bunny Cakesicles:
Edible Dough Delight: Once the edible cake dough has chilled, roll it into small bunny-shaped balls. You can use a bunny-shaped cookie cutter or hand-shape them for a personalized touch.
Stick the Landing: Insert candy sticks into the base of each bunny-shaped mold, creating the handle for your cakesicles.
Chocolate Tempering Magic: Now, let's venture into the art of tempering chocolate—a crucial step for a glossy finish and that satisfying snap when you bite into the cakesicle. We'll use white chocolate tinted with beautiful colors from our Choc Elite Collection for that classic bunny appearance.
Chocolate artists have been honing their craft for millennia. They are esteemed professionals and this is why chocolate is it's own specific class of talent, because it is not an easy medium to work with! It takes a lot of time to learn how to properly temper and color chocolate!
And Ed has been tempering chocolate since he was a teenager, and he claims it was one of the hardest mediums for him to learn. Today, has has some sound advice on how to achieve a proper temper - but, you must follow all of the steps below. It will take TIME so please be PATIENT with the chocolate, and yourself. If it doesn't work out perfectly the first time, keep trying. You'll get there!
- The most important step is to have the chocolate chopped into smaller pieces, unless you are using chocolate chips. Chocolate chips work just fine.
- You want the water to just start steaming, but not bubbling, on your double broiler.
- After adding the chocolate pieces (or chips) to your bowl - steadily mix the chocolate until it completes melts. You need to continuously mix or the chocolate could burn.
- Grab a thermometer, because you will need it the entire time. An infrared thermometer works perfect, too. You're aiming for a temp of 110-115 Degree Fahrenheit.
- When you reach this temperature, you need to bring it down very quickly adding the fresh chocolate "seed" as Jyoti mentions, unmelted. You're aiming for a temperature of about 90 Degrees Fahrenheit - at which point you can add a little more chocolate to cool it down further. At which point you can add more chocolate until it reaches 83-85 Degrees.
- Then put it back on the double broiler, continuously mixing, to prevent any hot-spots on the chocolate, getting it back to a temperature of 95 Degrees.
- To ensure you have proper temper, add a dollop of your chocolate to a piece of parchment paper. Put in the fridge for 5 minutes and it should hear a clear snap when breaking it in half. It also should not leave any residue on the parchment paper. Both of these are indications that you have a proper temper!
- You can reheat the chocolate on the broiler, but never exceed 105 Degrees after you achieve temper.
Cakesicle Coating Extravaganza: Dip each bunny-shaped dough ball into the tempered pre-colored chocolate, ensuring a smooth and even coating. Allow any excess chocolate to drip off before placing the cakesicles on a parchment-lined tray.
Colorful Encore: Before the chocolate sets, let your creativity shine by decorating the cakesicles with pastel-colored chocolate pieces, sprinkles, edible pearls, or colored sugar. This is where each bunny gets its unique personality.
Setting the Stage: Allow the decorated cakesicles to set in the refrigerator for at least an hour. This step ensures that the chocolate hardens to perfection, creating that irresistible snap when you take a bite.
Admire Your Whisking Wonderland Masterpiece: Once set, step back and admire your Easter Bunny Cakesicles—a delightful fusion of edible cake dough, tempered chocolate, and a burst of vibrant colors.
Part II: Tips for Tempering Chocolate Like a Pro
Tempering chocolate can be a bit tricky, but with the right techniques, you can achieve that glossy finish and satisfying snap. Here are some tips to guide you through the chocolate tempering ballet:
1. The Right Chocolate:
- Quality Matters: Start with high-quality chocolate. We like working with Ghirardelli white chocolate, Almond Bark is good too, or even - Callebaut. But Callebaut is quite soft, so keep that in mind as you add your thinning agents like coconut oil or crisco.
- The better the chocolate, the smoother your tempering process.
2. The Melting Marathon:
- Gentle Heat: Follow Ed's step by step instructions on how to slowly temper your chocolate in the microwave above.
3. The Temperature Tango:
- Temperature Precision: Invest in a digital thermometer for accuracy. Follow the temperature stages—melt, cool, and reheat—carefully.
4. The Cooling Choreography:
- Patience is a Virtue: Allow the chocolate to cool gradually. This encourages the formation of stable crystals, essential for proper tempering.
5. The Reheating Ritual:
- Gentle Reheating: If your chocolate becomes too cool before you're finished dipping, you will need to reheat. When reheating, do it gently and slowly. Avoid overheating, as this can lead to chocolate that loses its temper.
6. The Quick Dip:
- Swift and Smooth: Dip your cakesicles quickly and smoothly to achieve that flawless chocolate coating.
7. The Creative Flourish:
- Decorate Promptly: Once dipped, decorate your cakesicles promptly before the chocolate sets. Or you can follow what I did here and use a bag of warm chocolate to apply the already prepared chocolate candy pieces.
With these tips in hand, you're ready to take center stage in the chocolate tempering ballet.
Whisking Wonderland Concludes: Enjoy the Cakesicle Extravaganza!
As you unveil your Easter Bunny Cakesicles, relish in the joy of creating not just a treat but a masterpiece. The combination of edible cake dough, meticulously tempered chocolate, and vibrant decorations brings a sense of wonder to your Easter celebrations. Share these whimsical creations with friends and family, and let the magic of the season unfold in every bite. May your Easter be filled with sweetness, creativity, and the joy of whisking up wonderland-worthy delights!
THANK YOU!
Tag us if you try any of our techniques or confections in all of your social media posts too! We hope you enjoyed this Easter Bunny Cakesicles tutorial and let us know if you're gonna give it a try in the comments!
Click the links below to follow!